

Table of Contents
Brining is the secret to transforming ordinary chicken into something truly spectacular—moist, tender, and packed with flavor. Have you ever wondered why restaurant-style chicken is always so juicy? The answer lies in the perfect balance of salt, water, and seasonings that deeply infuse every bite with mouthwatering taste.
Whether you’re roasting, grilling, or frying, a well-made brine enhances the texture and flavor of your chicken, ensuring it stays succulent and never dry. In this guide, I’ll share the top five tips for making the best chicken brine recipe, so you can achieve that restaurant-quality tenderness right at home. Let’s dive in!
What is Chicken brine recipe?
Brining is a simple yet powerful technique that helps chicken stay juicy, flavorful, and perfectly seasoned. It involves soaking the chicken in a mixture of salt, water, and aromatics, allowing the meat to absorb moisture and seasoning from the inside out.
So why should you brine your chicken? Here’s what makes it a game-changer:
- Locks in Moisture – The salt alters the protein structure, helping the chicken retain more water during cooking.
- Enhances Flavor – A well-balanced brine infuses the meat with depth, ensuring every bite is seasoned, not just the surface.
- Prevents Dryness – Say goodbye to tough, overcooked chicken! Brining creates a buffer against high heat, keeping the meat tender.
There are two common brining methods:
- Wet Brine: A saltwater solution that deeply hydrates the chicken, ideal for roasting and grilling.
- Dry Brine: A salt-and-seasoning rub that draws out moisture before reabsorbing it, perfect for crispy skin in frying or baking.
Mastering chicken brining means unlocking a whole new level of flavor in your cooking. Now, let’s dive into the essential ingredients you’ll need!
Ingredients for the Best Chicken Brine Recipe
Creating a well-balanced brine is all about the right combination of salt, water, and aromatics. Here’s what you’ll need to make a flavorful and effective chicken brine recipe:
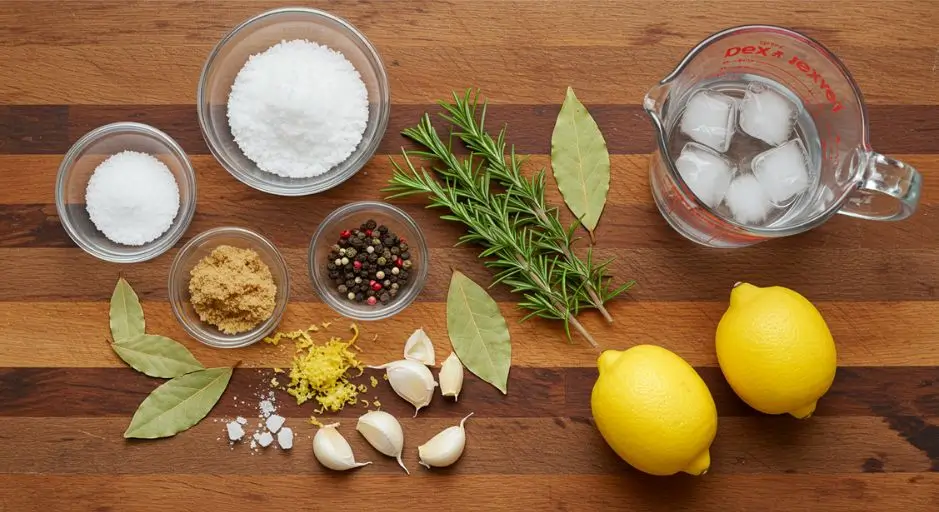
Basic Brine Ingredients:
- 4 cups water – Acts as the base to dissolve the salt and other ingredients.
- ¼ cup kosher salt – The key to moisture retention and enhanced flavor.
- ¼ cup brown sugar – Adds a subtle sweetness and helps with caramelization.
Flavor-Boosting Additions (Optional but Recommended!):
- 2 cloves garlic, smashed – Infuses a rich, savory aroma.
- 1 teaspoon black peppercorns – Adds a hint of warmth and spice.
- 2 sprigs fresh rosemary or thyme – Brings a fresh, herbaceous note.
- 1 bay leaf – Enhances depth and complexity.
- Zest of 1 lemon – Brightens the brine with a touch of citrus.
- 1 cup ice cubes – Helps cool the brine quickly before adding the chicken.
How to Make the Perfect Chicken Brine Recipe
Making chicken brine recipe is incredibly easy and takes just a few minutes. Follow these easy steps to achieve the best flavor and texture:
1. Dissolve the salt and sugar – In a medium saucepan, combine water, kosher salt, and brown sugar. Heat over medium, stirring until fully dissolved. Remove from heat.
2. Infuse with flavor – Add garlic, peppercorns, herbs, bay leaf, and lemon zest to the warm brine. Allow it to sit for 5-10 minutes to draw out the flavors.
3. Cool the brine – Add the ice cubes or let the mixture come to room temperature. This step is crucial—never submerge chicken in warm brine!
4. Submerge the chicken – Place the raw chicken in a large bowl or resealable bag, then pour the cooled brine over it, ensuring full coverage.
5. Refrigerate and let it work its magic – Cover and refrigerate for at least 2 hours (for smaller cuts) or up to 12 hours for a whole chicken.
Once brined, remove the chicken, rinse it under cold water, and pat it dry. Now it’s ready for cooking—whether you’re roasting, grilling, or frying, you’re guaranteed the juiciest, most flavorful chicken!
The Directions: How to Brine Chicken Like a Pro
Brining chicken is a simple process, but a few key steps can make all the difference. Follow this easy guide to ensure your chicken turns out perfectly juicy and flavorful every time!

1. Prepare the Brine
- In a medium saucepan, combine 4 cups of water, ¼ cup kosher salt, and ¼ cup brown sugar over medium heat.
- Stir thoroughly until the salt and sugar are fully dissolved.
- Remove from heat and add garlic, black peppercorns, fresh herbs, bay leaf, and lemon zest for extra flavor.
2. Cool the Brine
- Add 1 cup of ice cubes to speed up the cooling process.
- Allow the brine to cool to room temperature before use. Never add raw chicken to warm brine!
3. Submerge the Chicken
- Place your chicken in a large bowl, resealable bag, or airtight container.
- Once the brine has cooled, pour it over the chicken, making sure it’s completely covered.
- Cover and refrigerate for the appropriate amount of time:
- Chicken breasts: 1–2 hours
- Chicken thighs or drumsticks: 2–4 hours
- Whole chicken: 8–12 hours
4. Rinse and Dry
- After brining, remove the chicken and rinse it under cold water to wash off excess salt.
- Pat it completely dry with paper towels—this step is essential for crispy skin when roasting or grilling.
Your chicken is now prepped and ready to cook! Whether you’re roasting, grilling, or frying, the brine ensures it stays moist, flavorful, and delicious.
Variations and Substitutions
One of the best things about a chicken brine recipe is how adaptable it is. Whether you want to experiment with bold flavors, adjust for dietary needs, or work with what’s already in your kitchen, there are plenty of ways to customize your brine. Here are some smart variations and substitutions to help you craft the perfect brine for any occasion.
Salt Substitutes
Salt is the backbone of any brine, but if you need a lower-sodium option, try:
- Kosher salt (preferred for even dissolving and better absorption)
- Sea salt (adds subtle mineral notes)
- Pink Himalayan salt (for a slightly milder saltiness)
- Soy sauce or coconut aminos (both add umami while reducing the need for extra salt)
Sweeteners for Balance
A touch of sweetness balances the salt and enhances caramelization. Swap out traditional brown sugar for:
- Honey (adds floral notes and deep flavor)
- Maple syrup (great for a smoky-sweet touch)
- Molasses (rich and robust, ideal for darker meats)
- Fruit juices (apple or orange juice provides natural sweetness and acidity)
Flavor Boosters
Want to take your chicken brine recipe to the next level? Try these aromatic additions:
- Fresh herbs: Rosemary, thyme, sage, or bay leaves for a fragrant infusion
- Spices: Black peppercorns, coriander, or smoked paprika for depth
- Garlic & onion: Fresh cloves or powder for a savory kick
- Citrus zest: Lemon, lime, or orange peel adds brightness
Alternative Liquids
While water is the standard base, you can swap it for more flavor:
- Buttermilk (adds tenderness and a tangy depth, ideal for fried chicken)
- Apple cider or beer (adds subtle sweetness and complexity)
- Tea or broth (infuses delicate herbal or umami-rich notes)
With these variations, you can tailor your chicken brine recipe to suit your taste, cooking method, or dietary preferences. Next, let’s dive into the essential ingredients you’ll need to create the perfect brine!
Storing Tips: Keeping Brined Chicken Fresh
Proper storage is key to food safety and maintaining flavor. Here’s how to store your brined chicken correctly:

- Refrigeration: Always brine chicken in the fridge, never at room temperature. Use an airtight container or a sealed bag to prevent leaks.
- Brine Time Limits: Don’t over-brine! Avoid over-brining, as it can make the chicken too salty and alter its texture. Stick to the recommended times.
- After Brining: If you’re not cooking the chicken immediately, store it uncovered in the fridge for up to 24 hours after patting it dry. This helps the skin crisp up when cooked.
- Freezing: You can freeze raw brined chicken for up to 3 months. Just pat it dry, wrap it tightly, and store it in a freezer-safe bag. Thaw overnight in the fridge before cooking.
By following these tips, you’ll always have tender, well-seasoned chicken ready to go. Finally, let’s bring everything together with a few closing thoughts!
Conclusion
Brining is a game-changing method that enhances both moisture and flavor in chicken. By following these easy steps and expert tips, you’ll achieve a tender, juicy, and flavor-packed result every time.
Whether you’re roasting a whole chicken, grilling drumsticks, or pan-searing chicken breasts, a well-balanced brine ensures that every bite is seasoned to perfection. Plus, with the right storage methods, you can always have brined chicken ready for your next meal.
Now that you know how to create the best chicken brine recipe, it’s time to put your skills to the test. Try it out, experiment with different seasonings, and take your home-cooked chicken to a whole new level! Happy cooking!
FAQs
1. Is it possible to substitute table salt for kosher salt?
Yes, but keep in mind that table salt is more concentrated than kosher salt. If substituting, use half the amount to avoid an overly salty brine.
2. What happens if chicken is brined too long?
Soaking for too long can result in an overly soft texture and excessive saltiness. Stick to the recommended times:
Chicken breasts – 1–2 hours
Chicken thighs or drumsticks – 2–4 hours
Whole chicken – 8–12 hours
3. Should I rinse the chicken after brining?
Rinsing is recommended to remove excess surface salt, especially if you’re using a wet brine. Be sure to pat it completely dry before cooking to achieve the best texture.
4. Can I brine frozen chicken?
Yes! You can brine partially thawed chicken, but the brining process will also act as a quick-thaw method. Just ensure the chicken is completely submerged in cold brine and kept in the fridge.
5. Does brined chicken need extra seasoning before cooking?
Brined chicken is already seasoned internally, but a light sprinkle of herbs, pepper, or spices can enhance the final flavor. Just be mindful of adding extra salt!
Do you have questions about Chicken brine recipe? Drop them in the comments and let’s get cooking!